Showing posts with label Activity. Show all posts

Wednesday, November 6, 2019

Research Note #25 - Reading a Text File Line-by-Line with Fortran

Again, this is actually a very simple task which I usually deal with ... and forget, most of the time! That's why this post exists. The following is a basic Fortran code to enable you reading the contents of a text file, line-by-line. 

As an example, let's make a text file (named 'list.txt') containing a list of files with their complete paths on Linux:

$ ls ../gcom-c/aerosol/0524/pl/* > list.txt
$ cat list.txt

../gcom-c/aerosol/0524/pl/GC1SG1_20190901D01D_T0524_L2SG_ARPLK_1001.h5
../gcom-c/aerosol/0524/pl/GC1SG1_20190902D01D_T0524_L2SG_ARPLK_1001.h5
../gcom-c/aerosol/0524/pl/GC1SG1_20190903D01D_T0524_L2SG_ARPLK_1001.h5
../gcom-c/aerosol/0524/pl/GC1SG1_20190904D01D_T0524_L2SG_ARPLK_1001.h5

Now, this is the Fortran code to read file 'list.txt':

PROGRAM READTEXT
IMPLICIT NONE
CHARACTER(LEN=8) :: listfile
CHARACTER(LEN=70) :: filecontents
INTEGER :: io

listfile="list.txt"

OPEN(10, FILE=listfile, FORM="FORMATTED", STATUS="OLD",&
        ACTION="READ")

DO
   READ(10,"(A70)",IOSTAT=io) filecontents
   IF (io/=0) EXIT
   PRINT *, filecontents
END DO
CLOSE(10)

END PROGRAM READTEXT

How it works?

The program will open file 'list.txt', then read the first line of the file and put the (string) contents into variable 'filecontents'. It will then print the contents of variable onto the screen. Since there's a DO.. END DO statement, this process will repeat, with the next line being read, replacing the contents of variable 'filecontents'. This looping process will end once there are no more lines found in the file, invoking IOSTAT to a value other than 0 (0 means no I/O error occurred, other values mean there are I/O errors), then program will exit. That's all!

Some important notices:
  • The absence of 'DO ... END DO' will make the program only reads the first line of the file.
  • The absence of 'IF (io/=0) EXIT' will make the program runs endlessly, with the last line of the file kept being showed on the screen.
  • If the output format is not determined (for example, FMT=* instead of A70), the program will not correctly show the file's contents. The (character) length of this format should be same or more than the one at variable declaration. Why 70? Because in this case, the full path of file list (in one line) has 70 characters. 

Tuesday, November 5, 2019

Research Note #24 - Showing GCOM-C/SLGI Dataset Header/Metadata

One of the most important things to do while working with binary satellite data is checking the header/metadata of the dataset. By doing so, you could know the dimensions, parameters, variables and attributes of the data which will be needed for analysis (with program, script, etc.). These are three methods to show the GCOM-C/SLGI dataset header and attributes. I made this post because I always forget the quickest way to do it and ended up wasting too much time just for knowing some attributes of the data.

1. Using HDF View
This is definitely the quickest way and the most convenient way to check the headers and attributes of HDF data file. It works perfectly with MODIS as well as GCOM-C/SLGI. Just open the HDF file, and browse into the dataset directories. Simple!


2. Using h5dump
Works in similar fashion with ncdump. Just type the command and you're good to go. Not so convenient for non-Linux user.

Example:
h5dump -H <filename> --> Show header contents of a datafile
h5dump -a /Image_data/LST/Slope <filename> --> Show the contents of attribute 'Slope' (scaling factor) of dataset 'LST' of a datafile


3. Using SGLI Tool
This is by far the most not-convenient way to see the headers. Not only it's slow and taking so much of system resources, it also shows the header only (no attributes). To see the header, open a HDF file and go to Menu->View->Meta Data


Tuesday, October 15, 2019

Research Note #23 - GEE Script to Overlay Sentinel 2A with MODIS Terra/Aqua Hotspots

The main purpose of this script is to overlay MODIS Terra/Aqua hotspots product MOD14A1/MYD14A1 (daily thermal anomalies, lev3, 1km grid) over Sentinel-2A Thermal Reflectance (lev2, 10-20m spatial resolution). The channels used for Sentinel data is 11, 8 and 4 (SWIR1, NIR, RED) hence creating false color image over area of Sri Mukhtar Sahib city in Punjab region, India (14x zoom) on Google Map. Observation time was set between November 1 - 15, 2018.


/**
 * Function to mask clouds using the Sentinel-2 QA band
 * @param {ee.Image} image Sentinel-2 image
 * @return {ee.Image} cloud masked Sentinel-2 image
 */
function maskS2clouds(image) {
  var qa = image.select('QA60');

  // Bits 10 and 11 are clouds and cirrus, respectively.
  var cloudBitMask = 1 << 10;
  var cirrusBitMask = 1 << 11;

  // Both flags should be set to zero, indicating clear conditions.
  var mask = qa.bitwiseAnd(cloudBitMask).eq(0)
      .and(qa.bitwiseAnd(cirrusBitMask).eq(0));

  return image.updateMask(mask).divide(10000);
}

// Map the function over one year of data and take the median.
// Load Sentinel-2 TOA reflectance data.
var dataset = ee.ImageCollection('COPERNICUS/S2')
                  .filterDate('2018-11-01', '2018-11-15')
                  // Pre-filter to get less cloudy granules.
                  .filter(ee.Filter.lt('CLOUDY_PIXEL_PERCENTAGE', 20))
                  .map(maskS2clouds);

var rgbVis = {
  min: 0.0,
  max: 0.3,
  bands: ['B11', 'B8', 'B4'],
};


Map.addLayer(dataset.median(), rgbVis, 'RGB');

Map.setCenter(74.516872, 30.475603, 14);

var aqua = ee.ImageCollection('MODIS/006/MYD14A1')
                  .filter(ee.Filter.date('2018-11-01', '2018-11-15'));
var fireMaskVis = {
  min: 9.936350984054926,
  max: 107.38312795164352,
  bands: ['MaxFRP', 'FireMask', 'FireMask'],
};

Map.addLayer(aqua, fireMaskVis, 'Fire Mask');

var terra = ee.ImageCollection('MODIS/006/MOD14A1')
                  .filter(ee.Filter.date('2018-11-01', '2018-11-15'));
var fireMaskVis = {
  min: 9.936350984054926,
  max: 107.38312795164352,
  bands: ['MaxFRP', 'FireMask', 'FireMask'],
};

Map.addLayer(terra, fireMaskVis, 'Fire Mask');

Monday, December 24, 2018

Research Note #19 - Installing prep_chem_sources Utility for WRF-Chem

This has been probably one of the trickiest installations I've ever experienced, thanks to the lack of necessary library, limited references and bug in the source code. 

In order to install (or rather, compile) prep_chem_sources tool (I'll call it PCS from now on), HDF5, NetCDF and ZLIB libraries are necessary. Since NetCDF and ZLIB have been already available from previous WRF installation, one should only care about HDF5. Be advised though, HDF5 library of Oakforest super computer module was not compatible with the installation script. Thus, newly fresh HDF5 library is necessary (latest version might be compatible, thus keep checking updates of the super computer).

1. HDF5 Library Installation
Download the latest version from HDF group website. For this case, the version used is HDF5-1.10.4. Extract the file in a directory and execute installation script. Since PCS needs ZLIB and Fortran library, do not forget to mention them during the configuration.

$ ./configure --prefix=/work/gi55/c24223/libs/hdf5 --enable-fortran --enable-cxx --with-zlib=/work/gi55/c24223/libs/grib2
$ ./make
$ ./make check
$ ./make install

Make sure no errors occurred during the installation. After installing HDF5, put its path and LD_LIBRARY_PATH in the .bash_profile and re-load the file.

export HDF5=$PACSLIB/hdf5
export PATH=$HDF5/bin:$PATH

export LD_LIBRARY_PATH= ... :/work/gi55/c24223/libs/hdf5/lib

2. Download PCS tool
Download the tool from this ftp site directory: ftp://aftp.fsl.noaa.gov/divisions/taq/global_emissions

By the time this note was written, the latest version of PCS tool is ver. 1.5. Extract the tools inside any desired directory. Once extracted, there will a directory PREP-CHEM-SRC-1.5 with several sub-directories such as: /bin, /src, /extra etc.

3. Edit  convert_edgar_to_RELACS_REAC.f90 Script
This step should be done, otherwise PCS installation will fail with following messages:

convert_edgar_to_RELACS_REAC.f90(17): error #6405: The same named entity from different modules and/or program units cannot be referenced. [CO]
,CO &
-----------------------------^
convert_edgar_to_RELACS_REAC.f90(20): error #6405: The same named entity from different modules and/or program units cannot be referenced. [CH4]
,CH4 &
-----------------------------^
convert_edgar_to_RELACS_REAC.f90(21): error #6405: The same named entity from different modules and/or program units cannot be referenced. [SO2]
,SO2 &
-----------------------------^
compilation aborted for convert_edgar_to_RELACS_REAC.f90 (code 1)

make: *** [convert_edgar_to_RELACS_REAC.o] Error 1

The cause of this error is ironically simple: the absence of remark symbol ('!') in front of the 9th line of script convert_edgar_to_RELACS_REAC.f90 in the /src sub-directory:

8 subroutine convert_edgar_to_relacs_reac(isp,iespc,ident,spc_name_dummy)  !kml
9 use chem1_list
10 !use chem1_list, only : alke, bio,ora2,aro,ket,alka,ald

Thus, edit the script by adding '!' symbol in front of the said line using vi or other text editor.

4. Edit include.mk.intel.wrf Option Script and Compile PCS
This step is briefly explained on emission guide of WRF-Chem, however no further explanation about the script options available since it will strictly depend on the machine/system architecture. Anyway, one useful hint is: use the same options with WRF-Chem installation used, which are stored inside file configure.wrf inside /WRFV3 sub-directory.

Go to /bin/build sub-directory of PCS, and edit include.mk.intel.wrf option script (since the compiler used is intel compiler). Change these settings as follows:

update 2019/01/31:
Changed F_OPTS because the "longer" version caused crash during execution of utility for GOCART background data.

NETCDF=/work/gi55/c24223/libs/netcdf
HDF5=/work/gi55/c24223/libs/hdf5
HDF5_LIB=-L$(HDF5)/lib -lhdf5hl_fortran -lhdf5_fortran -lhdf5_hl -lhdf5 -L/work/gi55/c24223/libs/grib2/lib -lz -ldl

F_COMP=mpif90 -f90=ifort
C_COMP=mpicc -cc=icc -DMPI2_SUPPORT
LOADER=$(F_COMP)
C_LOADER=$(C_COMP) -DFSEEKO64_OK
F_OPTS=-fpp -D$(CHEM) -O3 -convert big_endian
C_OPTS= -O2

LOADER_OPTS= -O2

Save the script and compile PCS (for GOCART chem option):

$ make OPT=intel.wrf CHEM=RADM_WRF_FIM

If everything's going well, an executable prep_chem_sources_RADM_WRF_FIM_.exe will be created in /bin sub-directory. Check with ldd command to make sure there are no missing shared library links of the executable.

$ ldd prep_chem_sources_RADM_WRF_FIM_.exe
        linux-vdso.so.1 =>  (0x00007ffc35bbe000)
        libnetcdff.so.6 => /work/gi55/c24223/libs/netcdf/lib/libnetcdff.so.6 (0x00007ff8b2825000)
        libnetcdf.so.11 => /work/gi55/c24223/libs/netcdf/lib/libnetcdf.so.11 (0x00007ff8b23cf000)
        libhdf5hl_fortran.so.100 => /work/gi55/c24223/libs/hdf5/lib/libhdf5hl_fortran.so.100 (0x00007ff8b21a8000)
        libhdf5_fortran.so.100 => /work/gi55/c24223/libs/hdf5/lib/libhdf5_fortran.so.100 (0x00007ff8b1f45000)
        libhdf5_hl.so.100 => /work/gi55/c24223/libs/hdf5/lib/libhdf5_hl.so.100 (0x00007ff8b1d1c000)
        libhdf5.so.103 => /work/gi55/c24223/libs/hdf5/lib/libhdf5.so.103 (0x00007ff8b1679000)
        libz.so.1 => /work/gi55/c24223/libs/grib2/lib/libz.so.1 (0x00007ff8b145a000)
        libdl.so.2 => /lib64/libdl.so.2 (0x00007ff8b1237000)
        libmpifort.so.12 => /home/opt/local/cores/intel/impi/2018.1.163/intel64/lib/libmpifort.so.12 (0x00007ff8b0e8d000)
        libmpi.so.12 => /home/opt/local/cores/intel/impi/2018.1.163/intel64/lib/libmpi.so.12 (0x00007ff8b0208000)
        librt.so.1 => /lib64/librt.so.1 (0x00007ff8b0000000)
        libpthread.so.0 => /lib64/libpthread.so.0 (0x00007ff8afde3000)
        libm.so.6 => /lib64/libm.so.6 (0x00007ff8afae1000)
        libc.so.6 => /lib64/libc.so.6 (0x00007ff8af71e000)
        libgcc_s.so.1 => /lib64/libgcc_s.so.1 (0x00007ff8af507000)
        libhdf5_hl.so.10 => /work/opt/local/apps/intel/2017.1.132/hdf5/1.8.17/lib/libhdf5_hl.so.10 (0x00007ff8af2db000)
        libhdf5.so.10 => /work/opt/local/apps/intel/2017.1.132/hdf5/1.8.17/lib/libhdf5.so.10 (0x00007ff8aebb3000)
        libifport.so.5 => /home/opt/local/cores/intel/compilers_and_libraries_2018.1.163/linux/compiler/lib/intel64/libifport.so.5 (0x00007ff8ae984000)
        libifcoremt.so.5 => /home/opt/local/cores/intel/compilers_and_libraries_2018.1.163/linux/compiler/lib/intel64/libifcoremt.so.5 (0x00007ff8ae5f0000)
        libimf.so => /home/opt/local/cores/intel/compilers_and_libraries_2018.1.163/linux/compiler/lib/intel64/libimf.so (0x00007ff8ae061000)
        libsvml.so => /home/opt/local/cores/intel/compilers_and_libraries_2018.1.163/linux/compiler/lib/intel64/libsvml.so (0x00007ff8ac9ae000)
        libintlc.so.5 => /home/opt/local/cores/intel/compilers_and_libraries_2018.1.163/linux/compiler/lib/intel64/libintlc.so.5 (0x00007ff8ac740000)
        libirng.so => /home/opt/local/cores/intel/compilers_and_libraries_2018.1.163/linux/compiler/lib/intel64/libirng.so (0x00007ff8ac3cc000)
        /lib64/ld-linux-x86-64.so.2 (0x00005572db0f7000)
   

Tuesday, December 18, 2018

Research Note #18 - Installing WRF-Chem with Kinetic Pre-Processor (KPP)

The installation process is basically similar with typical WRF-Chem, with the additional steps to set KPP environment variables and flex library installation. To make it simple, these are the steps to install WRF-Chem with KPP. It assumes that 'yacc' (yet another compiler) has been installed into the system.

1. Install Flex Library
Flex library could be free-downloaded easily from many sources on internet. For this case, GNU flex used could be obtained from this link.

After downloading, extract the files into any desired directory. Next, run configuration script, and compile as usual. Simple as that.

$ ./configure --prefix=$PACSLIB/flex
$ make
$ make check
$ make install

Make sure that file libfl.a exists in $PACSLIB/flex/lib directory after compilation.
More detailed steps could be found here.

2. Setting the Environment Variables
This step is available on WRF-Chem manual. Just set the environment variables on bash shell for these values:

$ export WRF_KPP=1
$ export YACC="/usr/bin/yacc -d"
$ export FLEX_LIB_DIR=$PACSLIB/flex/lib

The most important thing, add the path of flex shared library (libfl.so.2) to the LD_LIBRARY_PATH of .bash_profile, otherwise, the installation of WRF-Chem will fail. For example:

$ export LD_LIBRARY_PATH=/home/opt/local/cores/intel/impi/2018.1.163/intel64/lib:/home/opt/local/cores/intel/compilers_and_libraries_2018.1.163/linux/compiler/lib/intel64:/home/opt/local/cores/intel/compilers_and_libraries_2018.1.163/linux/mkl/lib/intel64:/home/opt/local/cores/intel/compilers_and_libraries_2018.1.163/linux/compiler/lib/intel64:/home/opt/local/cores/intel/compilers_and_libraries_2018.1.163/linux/compiler/lib/intel64_lin:/home/opt/local/cores/intel/compilers_and_libraries_2018.1.163/linux/mpi/intel64/lib:/home/opt/local/cores/intel/compilers_and_libraries_2018.1.163/linux/mpi/mic/lib:/home/opt/local/cores/intel/compilers_and_libraries_2018.1.163/linux/ipp/lib/intel64:/home/opt/local/cores/intel/compilers_and_libraries_2018.1.163/linux/compiler/lib/intel64:/home/opt/local/cores/intel/compilers_and_libraries_2018.1.163/linux/mkl/lib/intel64:/home/opt/local/cores/intel/compilers_and_libraries_2018.1.163/linux/tbb/lib/intel64/gcc4.7:/home/opt/local/cores/intel/debugger_2018/libipt/intel64/lib:/home/opt/local/cores/intel/compilers_and_libraries_2018.1.163/linux/daal/lib/intel64_lin:/home/opt/local/cores/intel/compilers_and_libraries_2018.1.163/linux/daal/../tbb/lib/intel64_lin/gcc4.7:/home/opt/local/cores/intel/compilers_and_libraries_2018.1.163/linux/daal/../compiler/lib/intel64_lin:/work/gi55/c24223/libs/grib2/lib:/work/gi55/c24223/libs/netcdf/lib:/work/gi55/c24223/libs/flex/lib

Re-run the bash_profile script:

$ . ~/.bash_profile

3. Install the WRF-Chem
Finally, install WRF-Chem as described on this previous post. If the bash_profile file has already listed netcdf libraries and impi libraries, just go straight to step #3.

The compilation of WRF-Chem's executables with KPP is somehow longer than typical model. New updates and details will be added after WPS compilation. 


Thursday, August 16, 2018

Gunpla #38 - RG Sazabi WIP and Review


Sazabi will always be one of my favorite mobile suits in Gundam history. Therefore, when Bandai announced they would release it as an RG, I just felt nothing by hype!

On Saturday, August 11, 2018, it's finally released in Japan. I woke up early and rushed to one of the retail stores next to Kashiwa station to check it out. It was a pretty quiet Saturday, probably because most of people in the city traveled back to their hometown to celebrate Obon. Once I got to the store, I checked the shelves only to become disappointed to find no RG Sazabi there. I moved to another store, and again, no Sazabi. I wondered why I couldn't find it, was it sold out already? Here, at 11 AM?  I took a bus to another store, the one which has the most complete gunpla collection in the city, and finally I saw it. I saw the box.


Man, the box is so huge! It just like twice as big as an typical RG box, definitely an MG size. I took one of them, and grab some cash to the cashier. I bought it for 3600 yen, even though the original price is 4500 yen. In Japan, you will get 20-30% discount if you buy gunpla at retail stores, and even more if you buy the newly released kits.

The construction

Now, lets start building this monster. There are 17 runners in the box, quite normal for an RG kit. So why does it has a huge box? I was pretty sure that was because Sazabi itself is a huge mobile suit, and it should be the largest RG ever released to date. Anyway, I noticed something strange with one of the runners.


It's the B runner, the advanced MS joint, which serves as the inner frame for every RG kit. For a massive kit such as Sazabi though, I guess the parts were too few. Only 5 parts on it, and by the looks alone, I could tell that they should be the inner frame for 3 body limbs.

There were nothing special during the build process, except for the inner frame I mentioned above. I found out that Sazabi has 'another' inner frame for the feet and legs which are constructed from other runners, not from B runner. The inner frame was somehow similar with an MG kits. Interesting. The last RG I built was Banshee Norn, thus I don't know if this kind of inner frame has been already applied for RG Talgeese or just started with Sazabi. Nevertheless, the extra inner frames were more solid than the advance MS joint, hence making the feet and legs so sturdy. This is a good sign for the future of RG kits which are infamous for their fragility.


The next part to build was the waist unit, and there it went for the first part of B runner. It's one of the biggest parts of the kit, and as MG Sazabi ver Ka, it was packed with so many details on it. I found some sliding mechanisms for the back skirts, but not as extensive as its MG counterpart. The front and side skirts also have rotated clipping connectors which made them articulated really well. One should pay an extra attention while snap-fitting these parts, especially the back skirt, because sometimes, you will find that the parts are seemingly not fitted enough (even though, they are correctly fitted), and start to push or snap the parts too hard. This leads to stress marks or even breaking the parts. I suggest you check the manual carefully and just continue snap fitting other parts if you experience such situations. 


Next is the chest unit. Again, it uses an MG-like inner frame as feet and legs. Anyway, I had a small problem while building this part. The body-arm connectors were constructed on vertical pegs, and one should push them down tightly, as far as the parts went (as the manual said). This was where the problem started. It's so difficult to push the parts, and I just didn't want to break them, thus I just pushed them necessarily. Later, I found that the back part could not tightly cover the body because the arm connectors were not tightly pushed down enough. Anyway, problem solved by pushing the arm connectors carefully using a dull surface of my screwdriver. It was scary though.


Now, we get to the arms unit. This unit is arguably the most sophisticated part of the kit, because it houses both two main gimmicks of RG Sazabi: open hatch and wide-movement articulation. The remaining pairs of parts of B runner went for the arms unit. As MG ver. Ka, the arms looks very detailed with piston-like parts which extended if when the arms were bent. Similar with the waist unit, the shoulders have clipping connectors which enable the front and back parts to open, hence featuring the open-hatch gimmick.


The last body part is the head, which was I personally thought had the least feature of the kit. It also had open hatch gimmick by moving up and down the face part.


Next, let's build the back pack and funnels. If you have previously built MG Sazabi Ver. Ka, you might experience 'nightmare' while building those parts, especially the funnels. Well, for RG Sazabi, the build process was much more simpler. I could complete the whole parts in less than one hour. The most complicated part to snap-fit was probably the back covers of the back pack. Those parts were needed to be inserted first than rotated to fit in place. I was scared that I will broke the parts, but eventually, it just worked fine. So just stick on the manual and you'll be fine.


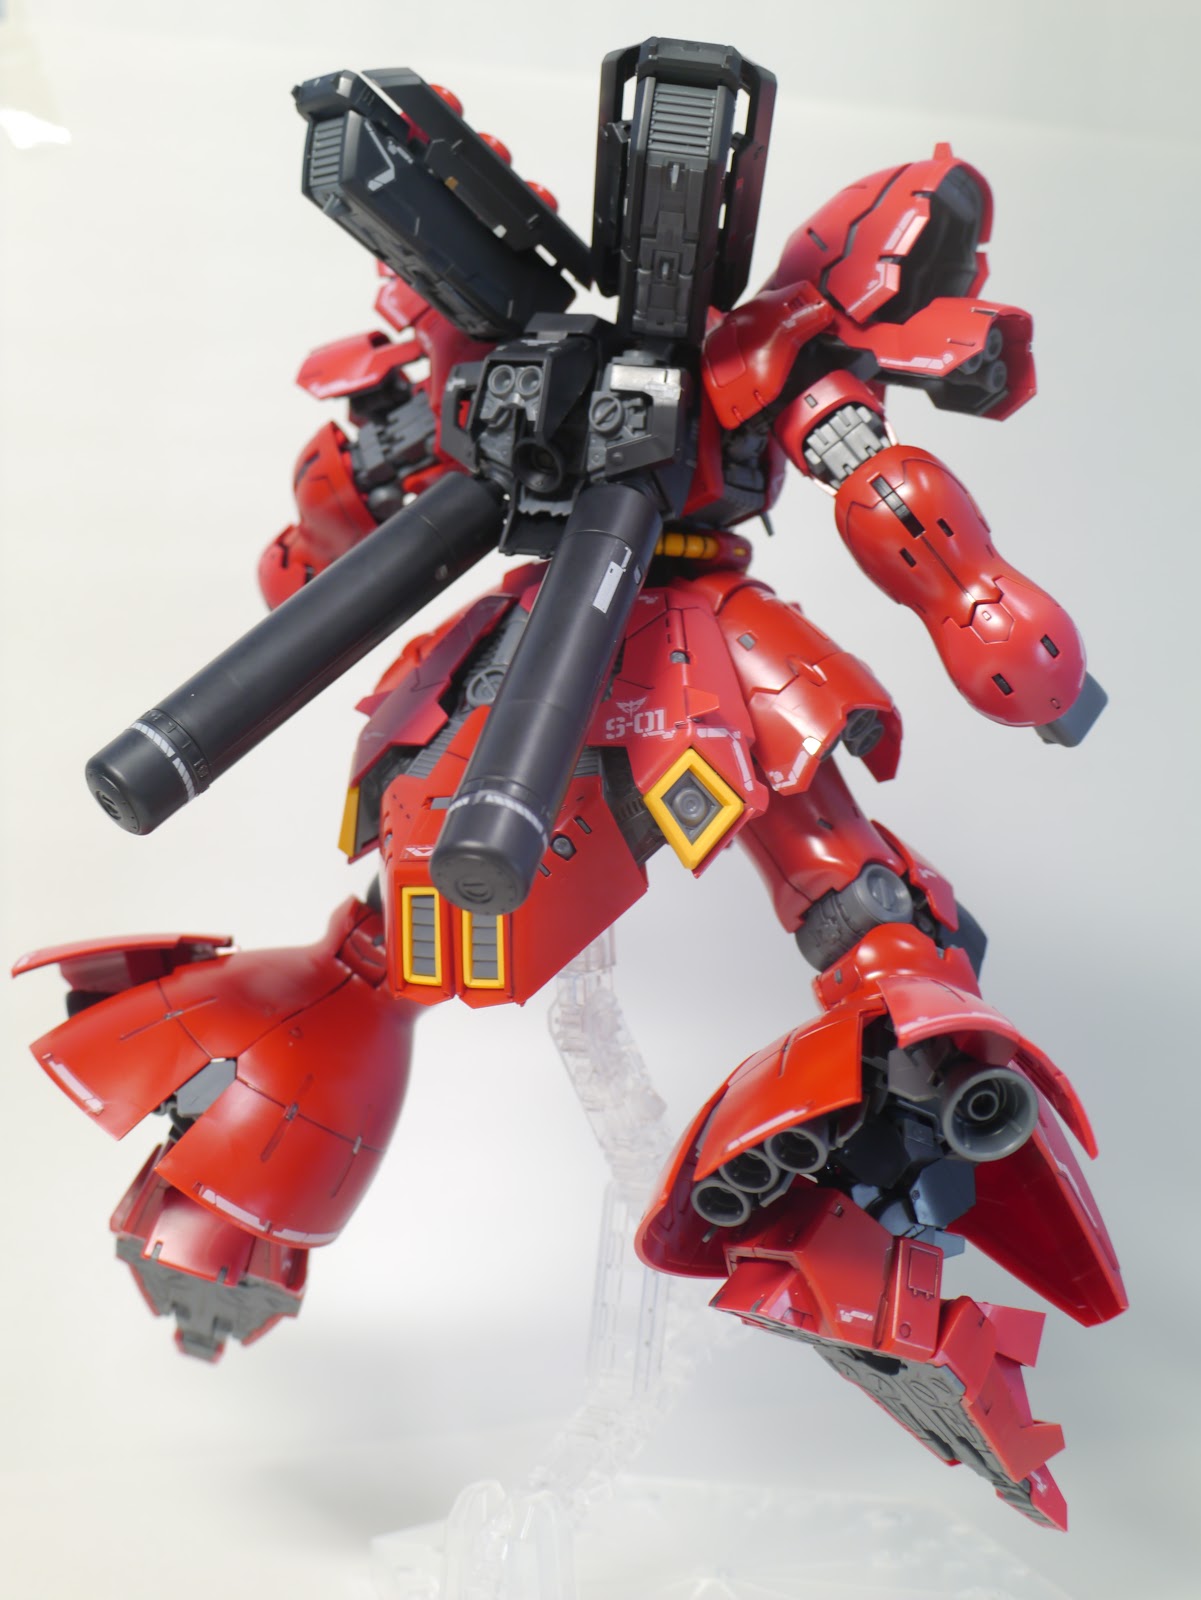
The backpack also features open hatch gimmicks by sliding the back covers and funnels launchers.


And finally, the weapons and shield were the last parts to put together. The construction for those parts was somehow very simple. Nothing special here. Ah, and don't forget about that tiny Char Aznable figure ^^.


The Aesthetics 

And now, time for the review.

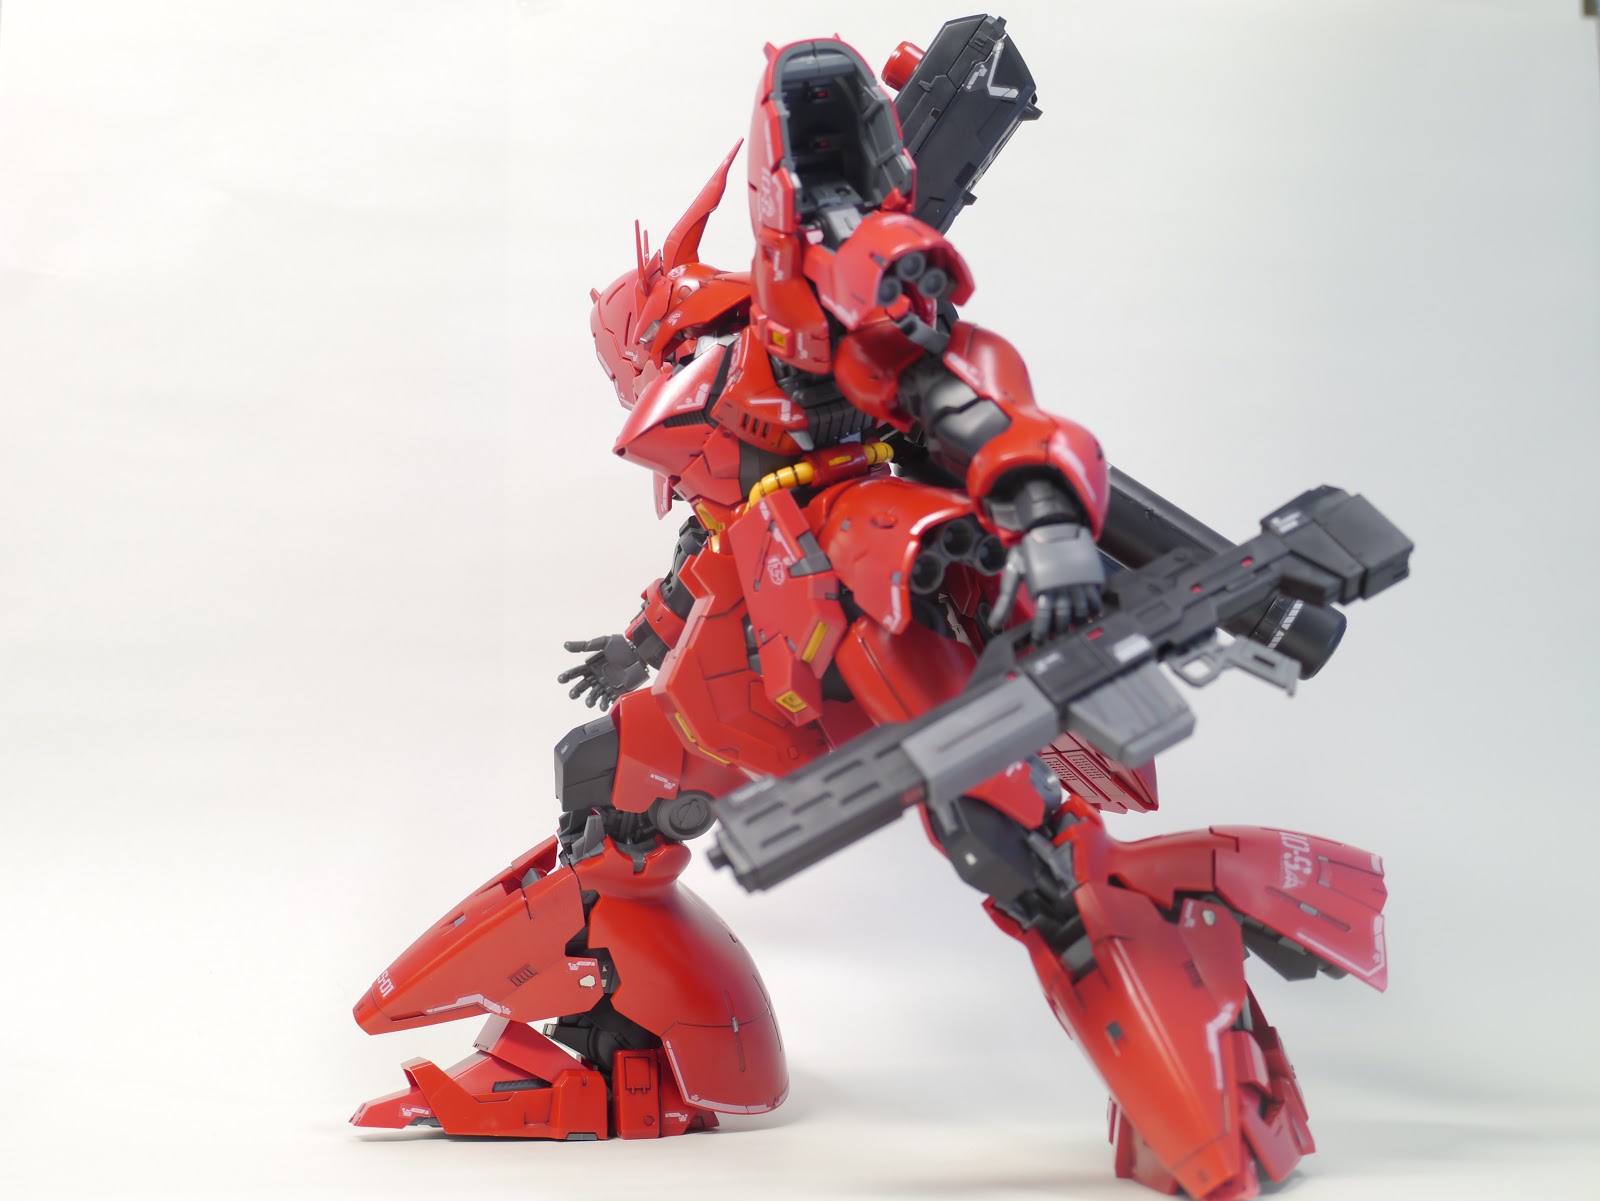
Speaking of design aesthetics, probably nothing can beat Sazabi, both in its MG (Ver. Ka) and RG forms. This could probably bias since Sazabi is one of my favorite mobile suit. But, come on ... just look at those details, the colors and badassery! I personally prefer the proportion of RG version over MG ver. Ka. While MG looks so bulky, the RG looks much more balanced and muscular, even when open-hatch gimmick is applied. I also love the shield of RG version which has some sharp edges than the more rounded MG one. Anyway, I feel a little bit off with the chest of RG version. I think it's too small compared to other limbs.


There are 3 tones of red with this RG kit, and all three is blending just right. Watching the kit standing with all weapons and decal applied brought really pleasant feeling to the eyes!

Oh yeah, the decal and foil sticker for this kit are pretty good. I was quite anxious before applying them, but it turned out to be working really well, even though I have to trim some quite annoying decal stickers, especially for the front skirt and legs. The markings were quite thin, so if you apply them carefully (and cleanly), you will barely see the edges.    

The Articulation and gimmicks
This is probably where RG Sazabi stands out among the other RG kits. We knew that RG line is infamous due its fragility, even though some kits are proven to be sturdier than the others (e.g. Mk-II, Exia, 00, Qant or Unicorn/Banshee). Despite the massive size, the articulation of Sazabi is amazing. The legs and arms could bent really far, and it still feels sturdy and strong while putting the kit into many kind of pose. I believe this is the work of the new 'unique' inner-frame.


This kit features wide-range movement gimmick, which enables some parts of the body to be extended to improve their movement to certain degree. One clear example of this is the arms. Just look at this:


By opening and re-snapping some 'hatch' points, the hands and arms could extend a little bit further. Finally, the base of hands (trigger and weapon-handle hands) also has special articulation. This is really useful for posing purpose, especially with the beam riffle. Therefore, in contrast with its MG counterpart, there's exactly no problem with holding the beam rifle on the RG version whatsoever.


And of course, there is also the widely anticipated open-hatch gimmick. This gimmick on RG is basically the simplified version of the MG ver. Ka. It applied to fewer parts but much more easier to pull than MG ver. Ka, and I personally felt quite safe to do it without any feels to broke the kit. The most difficult part to open is probably the side skirts, but I think that's not a big deal.

The Accessories
This kit gives you a beam rifle, shield, 4 beam saber hilts (2 are stored inside the arms), 1 beam axe hilt which could be stored in the shield, 3 missile/rocket (in the shield, could be detached), 2 beam saber clear effects, 2 short beam axe effects and 2 long beam axe effects. There are also 2 standard close hands, 1 trigger right hand, 2 melee weapon holding hands and 2 open hands. There are also spare parts for hand guard and hand joint.

And also, don't forget about the tiny Char's figure^^

Verdicts
I will make it short. This is the best RG I've ever built. It's beautiful, massive, badass, sturdy, sophisticated and fully articulated, really easy for posing. The 3-tones red color really stands out, the gimmicks are great and doing just fine. The only thing I don't like is the small chest, but overall, I prefer this version over the MG Ver.ka.

This is arguably the one of the best (if not the best) RG to date, and you should have it! Hands down!


--------------------

MSN-04 Sazabi

Pros:
  • Highly detail design
  • Great articulation gimmicks
  • Sturdy build

Cons:
  • Small proportioned chest